
Most people own a compass. Far fewer can pick one up cold and trust it. That gap matters more than it used to, because the thing we reach for instead, a phone, is the one piece of gear guaranteed to fail at the worst moment: dead battery, no signal, cracked screen, cold-shortened charge. A compass needs none of those. It only needs you to know five things.
Know the parts
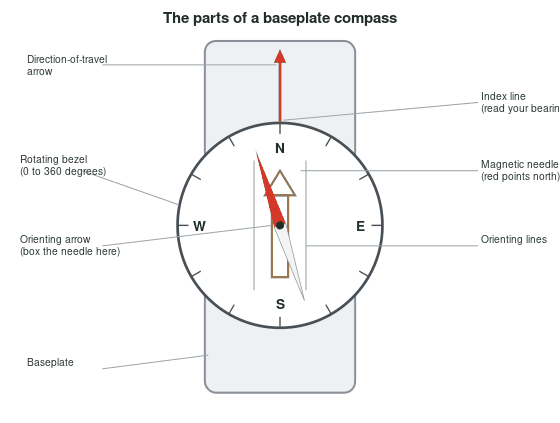
A baseplate compass has a clear base you can lay on a map, a rotating bezel marked 0 to 360 degrees, a magnetic needle whose red end points to magnetic north, an orienting arrow and orienting lines printed inside the housing, and a direction of travel arrow on the baseplate. That is the whole vocabulary. Everything below is just those parts working together.
Set declination once
Magnetic north and true north are not the same place, and the difference, called declination, can be more than fifteen degrees depending on where you stand. Ignore it and a long leg can put you a valley off. The clean fix is a compass with adjustable declination: find your local value on the map legend or from NOAA, set it once with the small key, and from then on your map bearings and field bearings match. If your compass is not adjustable, write the local declination on a strip of tape on the baseplate and apply it the same way every time.
Take a bearing from the map
Lay the compass on the map with one long edge connecting where you are to where you want to go, direction of travel arrow pointing toward the destination. Turn the bezel until its orienting lines line up with the map’s north-south grid lines, north on the bezel pointing to north on the map. Read the number at the index line. That is your bearing, and you have not needed the needle yet.
Follow the bearing in the field
Now hold the compass flat in front of you and turn your whole body until the magnetic needle settles inside the orienting arrow, red end forward. People call this “putting the dog in the doghouse” or “boxing the needle.” When it is boxed, the direction of travel arrow points exactly where you need to go. Pick a landmark on that line, a distinct tree or a boulder, walk to it, then box the needle and pick the next one. Aiming at a series of near landmarks keeps you honest over distance far better than staring at the dial as you walk.
The one drill that makes it stick
In a park or a big yard, set the bezel to 120 degrees, box the needle, and walk thirty paces. Add 120 to get 240, box, walk thirty. Add 120 to reach 360, box, walk thirty. If you finish roughly where you started, you have just walked a triangle on dead reckoning alone, and the whole system is now in your hands rather than your head.
Common mistakes
- Standing near metal. Car hoods, belt buckles, phones, and trekking poles all pull the needle. Step clear and hold the compass away from your body.
- Reading the wrong end of the needle. Red points to magnetic north. Confirm which end is which before you trust a single reading.
- Forgetting declination after switching maps or regions. Re-check it whenever you travel far.
- Watching the dial instead of the land. The compass sets the direction; landmarks keep you on it.
In September 2026, three novice climbers were rescued from Mount Shasta after planning the route with an AI chatbot and navigating by phone. When the phone died on the descent, they drifted off route in the dark and needed a multi-agency helicopter rescue. A compass and a paper map weigh a couple of ounces and never lose signal or battery.
None of this is difficult, and none of it depends on a charge. Learn it once in the backyard and it stays with you, quietly, for the next twenty years of trailheads.
Before your next trip: keep a baseplate compass and a paper map of your area in your pack even when your phone is charged, and run the triangle drill above once in the backyard. For more backcountry fundamentals, see the related reading below.
Related reading
- Ray Jardine Was Right. Ultralight Backpacking Missed the Point.
- Bandanas, The Underrated Backpacking Accessory

Recent Comments